
On this occasion we will learn a plugin called Parametric EQ / Equalizer on FL Studio DAW. This tutorial is part of an article entitled FL Studio - User Manual
Plugin Exchange, please visit the article to make it more obvious first
destination following this tutorial.
What is the use Parametric EQ plugin? This plugin is used in a process called Equalization, a process in which we tamper with the volume at a certain frekusensi. Still confused? It would be easier to understand if we knew what the purpose of the Equalization process, described in this article will use equalizer two main goals in making the song.
Changing Character Voices
Some of you may often find the equalizer feature on the car radio, even the composition in the smartphone media player. The equalizer features give you the option to adjust Bass and Treble. This feature is very useful if you want the songs you hear more bass or want dominance in treblenya. From this example one can conclude Equalizer goal is to change the character of the song suit the tastes of his audience.
In producing the songs we generally also require the equalizer, among them to change the sound character of instruments, such as vowel sounds mendem can be set using the equalizer to raise treblenya so that the sound can be bright.
Parametric Equalizer EQ plugin or volume actually works properly. Let's compare how the volume with equalizer plugin by observing the image below:

Explanation Image
Green area (left)
The volume knob on the FL Studio Mixer Track
Red line
Limit graphs generated the highest frequency sound
Orange area (below)
Frequency range, is the frequency at which the normal human voice can only hear sounds at a frequency of 20Hz to 20.000Hz. In the picture just written representation that the frequency of 50Hz, 100Hz, 200Hz, 500Hz, 1kHz, 2kHz, 5khz and 10khz.
----------------------------------------
In the picture above can be seen * a song frequency charts. Note
the volume knob on the green area (left) and the red line on the graph,
which means the position of the volume knob produces a frequency graph
of -30 decibels (red line). Then compare with figure 2 below:
* Every sound has a frequency graph, so is the sound produced by a song. Sound
frequency graph can be viewed using any additional plugins, including
plugins called "Spectrum Analyzer" that is inserted into the mixer
proper effect.

For a moment I lower the volume knob mixers, frequency graph go down. Illustration of Figure 2 can be interpreted, lowering the volume of work in the whole frequency (20Hz-20kHz) on a track.
BUT, using the Equalizer we can reduce (cutting) or raising (boosting) the volume / gain at a particular frequency. For example, by using the Parametric EQ 2 I will raise the frequency 8khz. Consider the two images below:
BUT, using the Equalizer we can reduce (cutting) or raising (boosting) the volume / gain at a particular frequency. For example, by using the Parametric EQ 2 I will raise the frequency 8khz. Consider the two images below:


In figure 3, the Parametric EQ 2 plugin, I used to raise (boosting) the volume / gain at frequencies 8khz. The impact graphics increased only in the range 8khz as in Figure 4, the graph on the other frequencies unchanged.This method is commonly used by the sound engineer to change the character of the sound an instrument. So Parametric EQ can be used on any instrument or can be used on the
master track that will affect all the instruments on the track.Clarify the existence of the Instrument Sound CollideCollision
results in detail and the existence of sound instruments are not
clearly audible and less comfortable to hear, usually common in a song
composed of many instruments. For a clearer example, listen to the commercial songs that have been
neatly arranged, in which each instrument in a song does not collide
with each other and can be heard clearly and comfortably.The collision occurred because some instruments sound has the same frequency range. How to cope? With Equalizer we can divide the collision frequency (Frequency Separation) to gain clarity of each instrument.Then what about practice? We assume there are two instruments that game was piling up, not
comfortable to hear and existence blurred, after checking eg using a
spectrum analyzer, it turns out the second game of this instrument are
in the same frequency range.As
an illustration, the buildup of the two instruments are in the
frequency range of 500Hz - 2000Hz (white area in the figure 5 below). To overcome such problems can use Parametric EQ 2, look at the picture below:

In figure 5 were two Paramteric EQ 2 plugin installed on two different instruments. Boosting or cutting is done to separate the buildup of sound frequencies that occur in the area of 500Hz to 2000Hz.
But be careful in boosting and cutting instrument sounds, if too much could have changed the character of the sound of an instrument or voice becomes natural, so only do that if necessary. These techniques included in the mixing process which requires considerable experience to be able to separate the frequencies instrument correctly.
Operation Parametric EQ 2 - FL Studio
We already know the purpose of the use of plugins equalizer, it's time to figure out the functions to operate Parametric EQ 2 plugin. Prior to start, for those who are still confused insert effects plugins into the mixer in FL Studio DAW, first article can be read here. If so, let us together consider the manifestation of the effects of Parametric EQ 2 below.
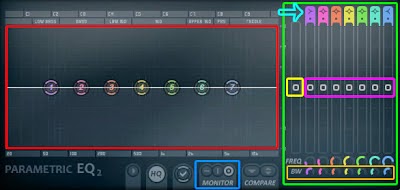
Explanation ImageRedWithin this area there is a monitor that shows the visualization of
spectral frequencies that occur in instrument sounds using this plugin.In
addition there are balls numbered (band tokens) amounted to 7 bands
where we can set the EQ by means of a direct click on the ball. In addition, some functions can also be found by right-clicking on each ball.Dark blueIs the frequency of visualization options. There are 3 choices of the Monitor off, monitor the input and output monitors. If
you choose off, we will not see a visual frequency in the red area of
Figure 6. If you select the output, it will look visually appropriate
frequency band setting token if it has been done. Input, simply provide a visual frequency of the sound source, even if you've set the visual token band will not change.GreenAll settings knob on the green area connected with the band tokens. Notice when you shift the band tokens must also be followed by a knob-knob on this area.OrangeThis section is Band Width (BW) which adjusts the width of the curve at each band token. Have you tried by raising or lowering one of the bands, for example, band 4 (colored yellow). If it is please set the corresponding BW band 4 which is also yellow.YellowThis knob is the gain of the entire band. If you are ascending the knob down all the bands will be affected in accordance with their respective position. This knob also works as the volume in general.PinkKnob-knob in this area is the volume / gain of each band. If you are ascending the lower band knob token will be affected, and
vice versa if you ride down this knob will move the token band.Light Blue ArrowThere are two settings in this area, namely Band Band Type and Order. Type band consists of disabled, low pass, band pass, High pass, band stop, Low Shelf, Peaking, High Shelf. I recommend to do the experiments of various types of the bands. Order band is setting the curve shape where there are 2 options ie shape and Step Gentle with each level.These settings can also be accessed by right-clicking on the band's token.------------------------------------------------------------------------------------------------------------Frequency sound has a vital role in producing a song, especially in the mixing process. Not
surprisingly, a professional sound engineer even require a very long
time to master the techniques of frequency equalization. As an initial experiment please your causes and consequences of
tinkering with frequency, because it will be a very valuable capital if
you are serious in music.So this tutorial and see you on tutorial Part 2 (coming soon).*
Note: The basic concepts in this tutorial use Equalizer general in
nature, meaning that this concept also applies to any DAW you use (not
just FL Studio). Explanation of Parametric EQ 2 plugin is only intended to FL Studio DAW users.To
complete understanding of the use of the Equalizer, I have found the
next article on the blog that explains the characters sound the
instrument at a specific frequency range, so that a better understanding
please visit this interesting blog EQUALIZER Use During Mixing.
